Hi Everyone! It's Misty from Think, Wonder, & Teach and Honey Bunch Blog Design! One of the questions I am emailed the most often about is how to create a blog.
Blogging has been one of the best professional development and reflection tools I have ever encountered. A lot of others agree and that is why each day more and more teachers are turning to blogging. The post below will help get you started. If you have any questions, let me know! I am just an email away!
I have heard from several people that they would like to start their own blog but have no idea where to begin. I believe that Blogger is the easiest to use and so have included a video below to get you started.
Now that you have your blog set up, we need to add items to your sidebar. Here is the steps to add a gadget to your sidebar, there are many different ones to choose from.
1. Log into blogger
2. In the drop down box select layout (it's before the view blog button)
3. Once the layout page is open, select add gadget button in your sidebar.
4. In the gadgets pop-up window, scroll down until you see the gadget you want.
5. Click on the blue + sign
6. Click on save
Once you have the gadget you can then click and drag it to the position you want. After doing so, click the orange save arrangement button at the top of your screen.
The gadgets that you will want to have on your blog include:
1. Followers
2. Labels
3. Search Box
4. Follow by Email
The following gadgets populate automatically:
1. About Me
2. Blog Archive
There are many gadgets to choose from so feel free to use whatever you feel best. These are simply our suggestions.

Showing posts with label tutorial tuesday. Show all posts
Showing posts with label tutorial tuesday. Show all posts
Tuesday, September 25, 2012
Tuesday, September 11, 2012
Tutorial Tuesday: Pinwheels for Peace
Pinwheels for Peace by Barbara Gruener
We'll be celebrating International Day of Peace on September 21st; what will be different about that day for you and your little peacemakers?

At Westwood-Bales, the art teacher, music teacher, and counselor (that's me!) are working in concert to create a visual representation of this International event with our Pinwheels For Peace project. Click {here} for the Pinwheel template.

Students in our art rotation will each decorate a piece of pinwheel paper to show how they're peacemakers. Our older artists will learn about squaring off, cutting and folding; the younger sprouts may need help with the cutting once they've finished their pictures. Parent volunteers will do the pinning to the pencil. Sharpen the pencils for easier entrance into the ground. Students can use a straw and a brad if they parade around with them inside instead of planting them outside.

Students in our music rotation will be learning a song about peace (with some Hebrew along with some sign language) that they will be singing and signing while our art students plant their pinwheels in the shape of a peace sign out in front of our school.
My job these two weeks is to talk with the students about being peacemakers. What does a peacemaker look like? Sound like? Feel like? Act like? Hope for? Do? Why would we want to be peacemakers? And is world peace even possible? Basically I get to prepare them for the celebration and I can't wait!
Are you ready for some Whirled Peace?
Click {here} for a video tutorial.
Thank you, Cachey Mama, for inviting me to share this idea with your readers. For more character-infusion ideas, please come by The Corner on Character.

Tuesday, September 4, 2012
Tutorial Tuesday: Pretend Play
Pretend play is such an essential part of childhood. My 2.5 year old has a grand imagination and loves pretending. Aiden enjoys making caves from blankets. Any time things go over his head (power lines, trees, bridges, etc), he sees them as tunnels waiting to be explored. Lately, he has been playing under the dining room table saying it is a tunnel. I decided to set up a little invitation for pretend play.

Our table has drop sides that make for a natural tunnel. I hung a blanket to the front and back creating a cave.

Inside the cave, I placed several of his stuffed animals.

The animals were going to have a party in the cave, and they needed some supplies.
I added some foam letters to a toy pan for some alphabet soup. I placed the soup on some torn pieces of orange paper that represented fire.

To a bowl of cheerios, I added some magnet letters and a spoon. The letters on top spell Aiden's name.

A stack of plates and a few plastic discs completed the setup.

When Aiden awoke from his nap, he saw the blankets covering the table. Curious, he looked at me. I told him he could go in the cave and see what was there. He crawled in and saw the party that awaited. He made some noises of excitement and began to play.
"I'm going to eat some cheerios," he said. "My animals want some, too." He passed out the plates and gave them each some cheerios. He pulled the letters out of the cheerios and named them each. "A - I - D - E - N that spells Aiden!" He gave the animals magnet letters and foam letters to eat along with their cheerios.
Not only was he practicing letter recognition, he was also working on fine motor skills by serving the animals. As he talked to the animals during his pretend play, he was working on language skills. Pretend play is a wonderful venue for practicing a number of different skills. It's all up to your imagination.
Thanks for letting me share our fun with you!
Would you like to see more ideas for toddlers/preschoolers from me? Here are a few of my favorites.
What Can you Learn from a Cardboard Tube?
20 Ideas for Practicing Measuring
Outdoor Sound Hunt Inspired by Mr. Brown Can Moo. Can You?

Trisha is a stay at home mom to her 2-year old son, Aiden. She writes about their adventures at Inspiration Laboratories, a blog dedicated to encouraging learning through creativity and play. Trisha is an educator with a passion for science literacy. It is never too early to start encouraging science learning (or any kind of learning for that matter). Follow along on Facebook, Twitter, Google+, and Pinterest.
Tuesday, August 28, 2012
Tutorial Tuesday: Puzzle Sight Words
Puzzle Sight Words
Happy Tuesday! I am so excited to be joining Cachey Mama's Classroom today. I am Jillian also known as A Mom with a Lesson Plan. One of my favorite lessons to plan is sight words. Making sight word practice fun and easy is one of the ways I keep my kids excited about learning new words.
How to Prepare
")
Do you have any old puzzles with missing pieces? Don't worry if all your puzzles are full sets, you can find a cheap puzzle at a garage sale, thrift store, or dollar store.
")
I used a puzzle with big pieces but any size pieces would work.
")
Put the puzzle pieces together. Make sure you have enough pieces connected to match the letters in the word you are making. Then flip the puzzle over so the back of the puzzle is up.

Write one letter of the word on each puzzle piece. That's all the prep you need. Easy right?
3 Ways to Play
I love this idea for a couple of reasons. Puzzle sight words is perfect for a quiet classroom activity or for at home practice. I also love that it can be varied to work with kids of different levels.
") 1. Lay out the sight word card right next to the letters needed to make the word. Mix the letters up a bit and then have your little one put the "puzzle" together to match the card.
1. Lay out the sight word card right next to the letters needed to make the word. Mix the letters up a bit and then have your little one put the "puzzle" together to match the card.2. Lay out the sight word cards. Mix up all the letters and have your little one create the words by finding the letters in the pile.
3. Mix up all of the pieces and ask your little to make words from the pieces available. This is a good one if you've already practiced these words quite a bit.

Besides a love for her kids (and well just kids in general) Jillian has a degree in Early Childhood Education and 10 years experience as a preschool teacher. Right now her “students” call her mom. Jillian believes that life offers an abundance of learning opportunities. She loves figuring out what they are and how they can be expanded on. Join the journey at amomwithalessonplan.com.
Tuesday, August 21, 2012
Tutorial Tuesday: "Capture the Pigs!" Math Game
Hi this is Casey from Second Grade Math Maniac! Thank you Lori for letting me share over here today!

Okay, so my tutorial is for a math game that you can use with kids at home or in the classroom to build fact fluency.
I am constantly reinforcing with parents how important it is for kids to add and subtract fluency without their fingers. They need to be able to focus on what problems are asking of them and not worrying about how many fingers they are going to need. :)
I made a cute game (with the audience of this blog in mind) to help kids practice adding numbers that equal sums of 10 or 100.
For my tutorial I used the 100 sum set.
First I cut apart all of the pigs. I used my paper cutter because I didn't have time to cut each pig out individually, I also think they will laminate better this way.

Second, I glued the instruction page to the front of a large envelope.

Third, I glued the barn to the back of the large envelope. After they match the sums they will put the pigs back into the envelope or "barn."

Click on the images download these games from Google Docs! You can have the version with sums to 10 or 100.


Enjoy your week everyone! :)

Tuesday, August 14, 2012
Tutorial Tuesday: Fall Centerpieces using Bag Painting
This week's guest blogger is Tina from Mamas Like Me. Her blog is packed full of all kinds of activities that she does with her children including crafts, letter and writing activities, math, science, recipes, and much more. Please stop by and get some wonderful ideas!
I saw the idea for finger-painting in a bag over at Open Hands and figured I'd give it a try with this activity. The bags made it easier (and less messy) for us to paint both sides of these Fall leaves - and I love how the colors blended.
I saw the idea for finger-painting in a bag over at Open Hands and figured I'd give it a try with this activity. The bags made it easier (and less messy) for us to paint both sides of these Fall leaves - and I love how the colors blended.
For this activity, we used:
Red, Orange, and Yellow paint
Leaf shapes cut out of card stock
(I highly recommend the card stock rather than regular construction paper)
Ziplock bags
Glitter Glue
Ribbon
A branch from outside

1. To prep for this, I cut leaf shapes out of card stock for each child.
2. Then, I put one leaf into each bag, along with a squirt of red, orange, and yellow paint, and a few drops of water to help it mix. Make sure there is some paint on both sides of the leaf. Try to get as much air out of the bag as possible when sealing it.

3. Next the kids had fun squishing the paint around and covered their leaves.

4. (Now, for the messy part!) I took the leaves out of each bag and replaced them with another leaf so each child got to do more than one.

5. When the kids were done covering their leaves, I offered them the option of just finger-painting with the paint in the bag. Some of them wanted to continue squishing with the paint and some were finished :)
6. Once the leaves dried, we used glitter pens to write each child's first initial on their leaves. (I love getting letters into an activity).

7. After the glitter dried, we hole-punched each leaf and tied it with ribbon.
8. Then, we went outside and found a branch to hang our leaves on and make our own Fall tree inside.

Doesn't it make an adorable centerpiece? You could also use these for garland or hang them in a window.
Tina is a former Elementary School teacher turned SAHM to three active boys (with one more on the way)! She blogs at Mamas Like Me where she shares kids activities, recipes, tips on frugal living, and reflections on life as ‘Mommy’.
Tuesday, August 7, 2012
Tutorial Tuesday: Setting up a Montessori Homeschool Classroom
Hello, this week's tutorial is graciously brought to you by Kerri from Momma of 4 Cutiez. Please stop by there and show her some love by leaving a comment. She has some good resources on Montessori and Autism. Hope you enjoy the tutorial!
Alright, I finally got the shelves up in our new school room downstairs. I still have to go through another laundry basket of "stuff" and put the maps and posters on the wall, but finally have most of it gone through!! So here it is....


Alright, I finally got the shelves up in our new school room downstairs. I still have to go through another laundry basket of "stuff" and put the maps and posters on the wall, but finally have most of it gone through!! So here it is....

OK, so the paint is out of place forgive me, but everything else looks pretty tidy!! :) To the far left is our sensorial shelf. Top shelf includes homemade keys and locks board, chalk boards, measuring cups, and pourers. I would not classify any of these items sensorial, but since we have our practical life shelf in the kitchen I needed a place for these guys to go during school time. The second shelf holds our current sensory bin, (which is the coffee sensory bin) our geometrical solids, (omit the paints hanging out there) our homemade sand drawing tray, and our oceans in a bottle we made with Mamma of Many Blessings. On the bottom shelf I'm holding my trays, smelling bottles, geometrical shapes, and our sound boxes.
The middle shelf is our language shelf. I only have my homemade sandpaper letters here for now. I usually keep my movable alphabet on top, but it's being held hostage by Lil Einstein currently.
Last shelf is our geography shelf. We haven't acquired much geography stuff yet. When I truly am in need of something Mamma of Many Blessings usually has what I need. :) I also believe you are able to acquire as you go. At least that's what I've been doing and it's been working for me. It's also better on my pocket book to spend a little bit here, and a little bit there. On the top of the geography shelf is our new cultural finds. The next shelf holds our children of the world finger puppets and globe filled with the children of the world wooden dolls. The kids really enjoy these!! We purchased them for fairly cheap at Oriental Trading Company. The next two shelves hold country flash cards and a map of the world puzzle I got from garage sales.

Our math shelf.

On the very top is our divisions board I got from Amazon and a clock I got at a used curriculum sale. The next shelf holds our division bead materials, base ten cube materials, our golden bead ten bars I made, sand paper letters I made, and more beading material I made also.

On this shelf is our spindle box and more base ten materials. You can never have enough base ten blocks!! You can use them in place of beading material.

On the bottom shelf I keep a basket with all my wooden cards 1-9, 10, 20, 100, 200, 1000, ect. Mamma of Many Blessing's husband so kindly cut these blocks of wood for me and I stenciled them in with the correct colors. Next is a learning puzzle, a basket of unix cubes, (Amazon) and our fractions board pieces (Amazon also).

The shelf on the right will eventually be our Science shelf. I haven't acquired enough Montessori Science material yet for it to be a "Science shelf". Right now it holds our odds and ends, a tornado twister, a microscope, and the lifecycle of a butterfly in a basket. All the rest are non Science related.

In the middle is our A through Z object box. This has little pull outs draws that hold our objects. I took a sticky label, cut it in half, and labeled A, B, C, ect. on the individual drawers. Next to that is our "Nature Table" which is not really holding nature stuff right now so I'm not going to bore you with details of the gardening stuff which it IS holding currently. It does have a cool water fall/rock garden. I originally had this at my peace table until I made a peace basket instead.

All my non Montessori materials on the top 3 shelves. Clear cut here. The next two shelves I put things that the kids can easily reach including polished rocks, basket of musical instruments, papers, crayons, basket of little kid books, and a bucket of sand they can play with.
Tuesday, July 31, 2012
Tutorial Tuesday
Well, I have no guest bloggers scheduled for today, so I thought I would share a couple of tutorials I have posted in the past.
Enjoy and have fun creating!

Enjoy and have fun creating!
Tuesday, July 24, 2012
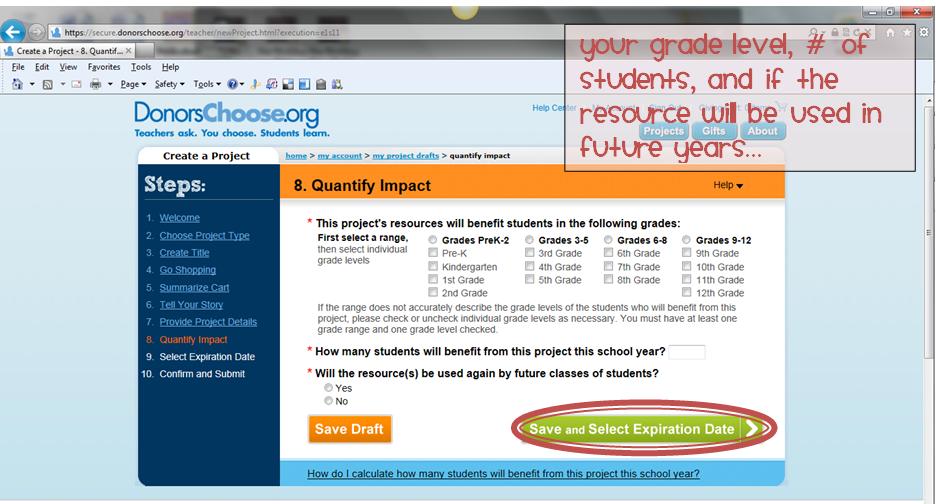
Tutorial Tuesday: Donors Choose
Hello everyone! I'm Mrs. Jessica Stanford from

I am so excited that Lori has given me this wonderful opportunity to blog to you!!!
After hearing from so many of you I realized that there are far fewer teacher bloggers on donorschoose.org than I thought!! If you are a public school teacher and you are not on donorschoose you need to get started now!! So for that very reason I'm going to show you how easy it is!!

If you would like to tell your friends and coworkers about donorschoose feel free to use or pin this button :)


If you have any questions, concerns, suggestions, or just plain ol comments let me know Jessica.Stanford@me.com!! If you like what you see, why don't you follow me?
Subscribe to:
Posts (Atom)